Back
Ten Things I have learned while developing an app for Zoho Desk
Admin
- December 30, 2019
7 min read
Introduction:
Zoho Desk is web-based help desk software that gives us the ability to manage our customer support activities efficiently. Zoho Desk allows us to assign, track and set up alerts on helpdesk tickets easily. We can customize Zoho Desk for our business and ensure satisfaction in our customer support experience
In this, I’m going to explain some important features which I have faced while developing an app for Zoho Desk. The features are
1.Installation
As the first step to create an extension, we must install the node.js runtime environment. Next, we need to install the ZET (Zoho Extension Toolkit) Command Line Interface (CLI) tool, which enables us to build, test, and package extensions for Zoho products.
To install Zet in Mac/Unix system:
sudo npm install -g zoho-extension-toolkit
To install Microsoft Windows system:
npm install -g zoho-extension-toolkit
To check the version for Zet:
zet -v
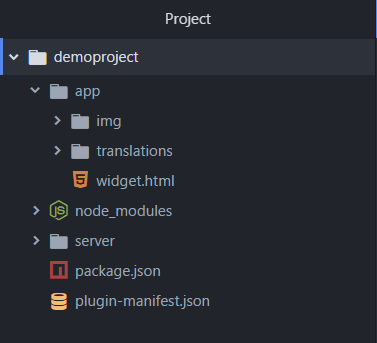
After Install the Zet. Create a new project by using the command Zet init and choose Zoho Desk and provide a name for the new project.
The Zoho Desk project folder looks like
To use the application in developer mode, open the Zoho Desk portal. Then open browser developer tools and from the console, invoke the runDevMode() JavaScript code. This action refreshes the page and activates the development mode. Open a ticket and click the Marketplace icon which is located on the top right side. The extension appears
2. Data APIs
Zoho Desk has provided a set of APIs that helps to interact between our extension and our help desk portal. The APIs available are:
- Ticket Object - This object provides access to get the various properties of a ticket
- User Object - Fetch the information for a particular user.
- Portal Object - Fetch the Zoho Desk plan, id, name and customDomainName used in the portal
- Department Object-List a specific number of departments from the help desk portal.
Example for Data APIs:
ZOHODESK.get("ticket.").then(function(response){
  // response returns the property data of the ticket
})
3.Data Storage APIs
Sometimes, the extensions we create might require data storage and retrieval capabilities. So that, Zoho Desk provides a data store for extensions to set (store) and get (retrieve) data. The data can be deleted when it is no longer required.
The following APIs provide database management functionalities to extensions
Get data: Fetch data from the connected database.
Set data: Asynchronously set data in the connected database.
Delete data: Delete data from the connected database.
4.Request API
This API avoids CORS-related issues and successfully run third-party APIs from the extension.
- Can access the Zoho Desk's APIs
- Can access the External Services's APIs
- Can access the Extension Data Specific APIs such as storage, configParam and log APIs
With this, we can integrate Zoho Desk with third-party apps.
5.Hook APIs
Event Hooks help developers to introduce their own middlewares in the execution flow of certain UI actions.
Like events, developers need to subscribe to this event hooks to control the execution of UI action by allowing or terminating the flow.
Example:
When an agent tries to close the ticket, the extension checks if the corresponding issue in the third-party tool is resolved. If it is resolved, the extension can give the go-ahead to close the ticket in Zoho Desk, else the ticket close event will not be executed and a relevant message will be displayed
Zoho Desk currently supports hooks for the following events are:
- Reopening a ticket
- Closing a ticket
- Adding a ticket comment
- Editing a ticket comment
- Changing the status of a ticket
- Sending a ticket response
- Closing a ticket on sending ticket response
6.Multi-Widget Support
Users can access an extension through more than one widget on the Zoho Desk UI. Adding multiple widgets for our extension is a simple task. All that we need to do is include the properties of each widget, separated by a comma.
Example:
{
  "location": "desk.ticket.detail.subtab"
  "name": "Client SDK",
  "url": "/app/app-iframe-view.html",
  "logo" : "./app/img/1.png",
  "icon" : "./app/img/1.png"
};
Just add the widget function in plugin-manifest.json and give the location to use the widget.
7.Modal Boxes
Besides the main widgets, we can also display information or fetch user input through modal boxes. Modal boxes are UI elements in which users must perform a particular action as part of the overall process. As a result, users will be able to continue using the app on the main window only after performing the said action on the modal box.
To configure a modal box in our extension, create an HTML file and like the file with app.instance.modal.
Example:
App.instance.modal({
  url: '/app/modal.html',
  title: "Modal box"
})
8.Platform Event Callbacks
Marketplace supports callbacks for extension's events. We can subscribe to the supported events and when the extension event is triggered, callbacks are invoked. With this event, we can get instant data from the Zoho Desk.
Supported Platform Event Callbacks are
- onInstall
- onZohoAuthorise
- onTPAAuthorise
- onTPARevoke
- onUpdate
- onConfigParamAdd
- onConfigParamDelete
- onUninstall
Extension manifest's callbackListener property is used for declaring the callbacks for the extension's events. To subscribe to an event, specify the callback URL in the manifest for the callback Listeners respective event
9.Connections
Connections can be used for the authentication of Zoho and External Services which provides the simplified solution where the authentication process (such as OAuth Client registration, redirection) is handled internally. Authorization of third-party services listed in the connectors page is taken care of by Zoho Desk. As a developer, we just need to add functionalities for the integration by creating the connection.
To configure a connection for a third-party service, perform the following step,
- Visit the All Connections in Zoho sigma Page
- Click Add Connection, then the list of third-party services currently supported will appear.
- Click the service you want. Then give the connection name and credential for the service.
- After, click the Create and Connect button.
- The Connection Summary page appears. In that click JSON tab and copy the connection data.
- Go to the plugin-manifest.json file of your extension and paste the code snippet under the connector key.
- Our extension is now connected to the third-party service.
10.Validating and Uploading the Extension to the Marketplace
Validating the Extension:
- Open the terminal/command prompt and navigate to our project folder
- Execute the zet validate command.
- Validation result will appear. If required, we can change the code.
- Execute the zet pack command to zip our project. It will be located in our dist folder in our project.validate
Uploading the Extension:
After packaging our extension, perform the following steps to upload the zip file of our extension for review
To upload our extension, perform the following steps:
- Visit the Extension in Zoho sigma Page.
- Click new Extension which is located on the right top corner.
- Then give the app name, description and choose the service Zoho Desk.
- Upload the latest zip file from dist folder which is located in our project folder.
- After clicking save as draft and click publish and choose private or public to publish the app.
As a fresher, I have learned such many things in new technology and actively exploring many more. If you are interested in the same what I have learnt and if need to know more about it, please feel free to comment below. Have a great day :)